


Artemis 1.1a - 280 Megapixel Mosaic
- Shaun C Tarpley

- Jan 27, 2023
- 5 min read
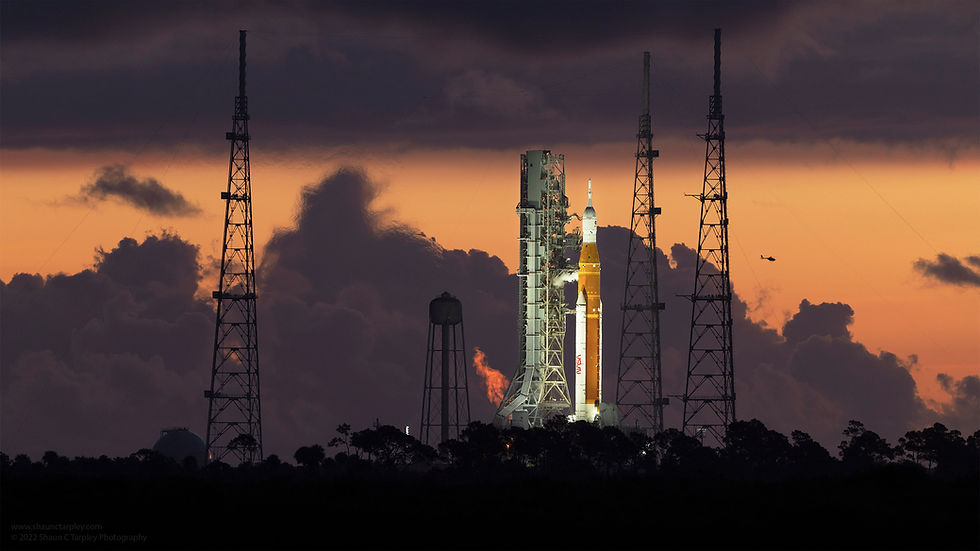
The unpredictable Florida weather was a consistent nemesis for Artemis I and for our multiple attempts to view its first launch. In fact, when I started writing this post in November of 2022, Artemis had just weathered Category 1 Hurricane Nicole with wind gusts up to 100 mph measured from the top of the tower. Given this, it seems fitting that the one opportunity we had to see the rocket prior to launch was marred with weather restrictions. Never one to be deterred by bad weather (I'm a Houstonian after all), I did what I could with the given circumstances and managed to create a 280 million pixel mosaic of Artemis I. While the weather conditions and shooting location weren't what I had hoped for, given the number of storms that Artemis I weathered to make it to launch, the stormy backdrop actually feels spot on.

This image is a 1:1 crop of the mosaic to give a sense of the detail hiding in the full image
I had originally planned to include this mosaic image with my blog post about our visit to the Kennedy Space Center as a whole, but it is honestly so big that it deserves its own post. The image above is a 1:1 crop of the full-size image with a resolution of 2560 pixels by 1707 pixels (though the image you see may differ based on the resolution of your monitor or device). It gives a good sense of the amount of detail that exists in the full-resolution image. If I printed the final image at the standard resolution of 300 pixels per inch, the printed image would be over 3 feet wide and 6 feet high.
When I heard that our tour would include a visit to Launch Pad 39B, I hoped that it would be possible to take a picture of Artemis from the center of the gravel Crawlerway that leads to the launch pad. If I was able to set up far enough away from the pad (around 3000 feet), I would be able to reduce line convergence which creates the feeling that a tall object is leaning back. However, just as we headed to see the rocket up close, a large storm blew in with heavy rain and multiple close lightning strikes. Anyone familiar with KSC or the KSC Visitor Complex knows about the infamous lightning protocols that require visitors to seek shelter during a storm. With a Phase II warning in affect, we were not allowed to leave the vehicle to take any photos around the pad.

Since so many components of the SLS system were easily visible in this image, it felt like the perfect opportunity to create a diagram to identify some of the primary components of Artemis I and the Mobile Launcher
I tried to take photos from inside the bus, but the dark-tinted, wet convex glass of the large windows heavily distorted the images. Fortunately, our tour team was kind enough to orient the bus so we could get a view of the rocket from the parking lot to the right of the pad. The top of the buildings in front of the parking lot blocked the bottom of the launcher, but the majority of the view was unobstructed. We couldn’t exit the bus, but we were allowed to take photos from the elevated steps preceding the open doors at the front of the bus. I took a few shots with the zoom lens, but it distorted the image and limited detail, so I went back to my seat and loaded up the 500mm lens. It wasn't possible to set up a tripod and properly take the images based on the focal node of the lens/camera combination. Instead, I just hung out the door like a crazy person and took a dozen photos handheld as best I could starting from the top and working downward.
My makeshift method was better than nothing, but it meant that I created a ton of work for myself in post processing to manually orient and align the images together. It took multiple late nights of work to stitch together the 10 optimal images into a 10GB monster Photoshop file. Exposure balance was also a challenge due to the dark lighting conditions of the tower which forced me to boost ISO (leading to noise), and the high contrast between the sky and the rocket which required me to slightly underexpose the image. Due to image overlap, the 450 Megapixels of total data from the 10 images was reduced to around 280 MP in the final aligned image (the D850 shoots at 45 MP). To date, it is one of the largest mosaics I have ever created with a file size of nearly 4.4 Gigabytes for the final, flattened crop. Even with my new, very fast computer, it still takes about a minute to save the full-size Photoshop file each time I make revisions.
The following image isn't at full-resolution. As you can see from the 1:1 image at the top of the page, the entire rocket just wouldn't fit within the pixel width restrictions of this blog (or most computer screens for that matter). However, the image below is the the highest resolution crop that fits the majority of the rocket and launch tower within the blog's width limitations. It takes a little while to scroll, but it's the only image I have of Artemis that provides a small sense of what it feels like to view the rocket in person.

If you look closely on the lower left, you will see an approximate scale reference of a 6'-0" human
Mosaics are a lot of work, but in addition to greater detail, they often provide a more natural field of view which is closer to how the human eye sees the subject in person. Wide angle lenses are great, but they can create extensive distortion that makes an image feel less natural (especially the closer you move to a subject). Additionally, taking a single photo from far away has fewer pixels per inch to provide detail, and the atmospheric distortion at that range also degrades clarity. When you compare the shots side by side, you can really tell the difference.

Mosaic (left) 28mm Wide Angle (center) 500mm Telephoto (right)
The Mosaic and Wide Angle shots were taken from the same location roughly 2,000 feet from Artemis I, so they share a similar viewing angle from below the rocket. If I had been able to move forward to get more of the rocket in frame with the wide angle lens, the detail would be higher, but the distortion would be much stronger. The Telephoto shot was taken at 500mm from the top deck of the LC-39 Observation Gantry (approximately 60 feet above the ground and 11,500 feet from LC-39B).
The Telephoto shot has a more rectilinear perspective with minimal line convergence due to the greater distance from the subject and a higher viewing angle. However, it suffers from a lack of data to draw detail from and the lower half is blurred heavily by atmospheric distortion from radiant heat evaporating water from the terrain between me and the rocket. Even at the same resolution (1280x2500), the Mosaic is sharper and better exposed because it has more data to draw from (280MP vs 45MP). The noise of the original mosaic shots is also mitigated by the translation of hundreds of millions of pixels down to 3.2 million. The best of both worlds would have been to take a mosaic from the center of the Crawlerway, at a height roughly equal to the center of the stack, and at a distance away of only 3,000 feet or so. However, since no such viewing location exists, and Artemis I has already launched, I guess I'll have to leave that optimal mosaic on my 'unlikely to happen' wish list.
If you are interested in learning more about the Space Launch System (SLS) before the launch of Artemis II, I highly recommend the detailed information that is publicly available on NASA's website:
We saw a lot more during our tour of the Kennedy Space Center, so I will cover the Florida coast's ever-expanding launch complex in my next post.
© 2017-2023 Shaun C Tarpley


Comments